Building Tips
STARTING THAT NEW ROCKET!
I start each new rocket project with a fresh new blade in my knife and new 400 grit sandpaper in my sanding block. My pencil is sharpened.
If I am building a kit:
I thoroughly read the instructions and make notes
I prep and test fit the parts, making adjustments as necessary
TIP: Check out the kit review at www.rocketreviews.com
Chances are, another modeler has done a build and review of your kit. You can learn from their building experience and mistakes!
OPENING THE KIT
As always, open the kit and check the contents with the parts list. If something is missing, email the manufacturer and let them know. Most will respond and send out a missing part right away.
If you are like me, you may have several projects going at once on your workbench. Keep the kit bag to store all the parts.
STRENGTHENING THE BODY TUBE ENDS
Both ends of the motor and body tubes are the weakest parts of the tubing. The body tube ends can be strengthened. I firm up the tubing with medium super glue.
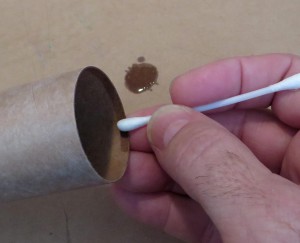
Have a few Q-tips ready. Squeeze out a drop of medium CA glue onto a scrap piece of cardboard.
Hold the body tubing with your left hand. The tube is parallel to the floor, the open end facing your right hand.
Dip the Q-tip into the CA glue drop and spread the glue around the inside end of the body tube. Coat the inside tube wall for about 1/4″. The CA coating will darken the tube.
After the CA coat dries, smooth out the rough glue with some 400 grit wrapped around your finger. You’ll want the tube interior smooth for installation of the engine mount or nose cone. This CA tube coating strengthens the tube ends. It will not prevent a “zipper” if your Kevlar extends past the end of the tube.
ENGINE MOUNT TIPS
Centering rings are sometimes a tight fit around the engine tube. If the centering rings go over an engine hook, you can cut a notch on the inside of the ring. Too much pressure from the centering ring over the engine hook could compress the engine mount tube out of round. Notch two lines (the width of the hook) with your knife and peel out a layer of paper.
You may want to sand down a “burr” on the inside of the centering rings. This helps the rings clear the ends of the engine tube. Take 400 grit sandpaper over your index finger and sand away a small bit of the squared inside edge of the centering rings. If it is still to hard to slide the rings over the tube, take the tip of your hobby knife and peel away one thin inside layer of the centering ring and check the fit again.
Dry fit and slide the centering rings into place (no glue yet). Check suggested measurements, THEN add the ring / glue fillets.
GETTING GLUE INTO THE BODY TUBE
FOR THE ENGINE BLOCK or ENGINE MOUNT
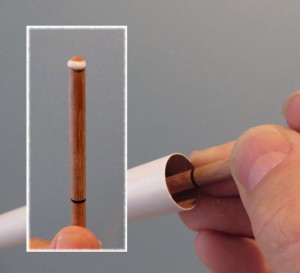
I use a 12″ long by 1/4″ diameter dowel for BT-5, BT-20 and BT-50 tubing. For a glue applicator, I sanded the end of the square dowel round. A bead of white glue will go on the rounded end of the dowel.
If the instructions say to put a bead of glue 2 1/2″ from the end of the tube, I’ll mark the dowel 2 1/2″ from the rounded end. Also mark the engine casing used to push the engine block in, according to the measurement in the instructions.
Before any gluing, test fit the engine block just inside the body tube edge. If necessary, sand the outside of the engine block until you get a slip fit in the tube.
To see how the applicator will work, (without glue on the dowel end) slip it into the body tube end up to the mark on the dowel. For practice, don’t let the dowel tip touch the inside of the body tube until you reach the pencil mark. Rotate the dowel tip around the inside of the tube using the end of the body tube and the pencil mark on the dowel as a depth guide.
You must move fairly quickly whenever gluing an engine block in a small diameter tube.
BEFORE USING GLUE:
Have your sized engine block and (marked) spent engine casing close at hand and ready!
Use enough glue so the block can slide into position! Ideally, you want a small glue bead completely around the top of the engine block. You don’t want the glue to set up and stick the engine block in the wrong position.
TO LAY THE GLUE “BEAD”:
Put a good sized bead of white glue around the rounded dowel tip. Apply enough so you can “roll” a bead of glue inside the tube, not enough so the glue can run. Don’t let glue get all around the inside of the tube, only apply glue to the area where the engine block will be positioned. Don’t let the glued tip touch the sides of the tube until the pencil mark is even with the bottom of the tube.
It may take a second dowel/glue application to give a full round bead in the engine tube. If you use too much glue, the tube can become saturated. That heavily glued interior of the tube could shrink when drying. You might see a slight “depression” ring from outside the tube where the bead of glue is.
Quickly place the engine block into the end of the tube. Push it into the tube with the (marked) engine casing up to the measured line on the casing. Withdraw the casing immediately!
SQUARING UP A BALSA NOSE CONE SHOULDER
Check the fit of the nose cone in the upper body tube. If too tight, lightly sand the shoulder of the nose cone with 400 grit sandpaper on a block. Be careful not to sand into the balsa shoulder.
Push the nose cone into the tube. The nose cone shoulder (overhang lip) is often a bit wider than the body tube diameter. Leave the cone in the tube and sand the balsa shoulder flat and even with the tube diameter using 400 grit sandpaper on a block. Sand only the balsa shoulder, being careful not to sand the body tube.
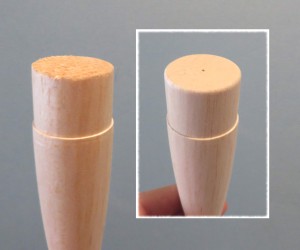
Next, square up the nose cone shoulder. With the nose cone in the body tube, turn the cone while lightly pressing the body tube against the balsa shoulder. The body tube edge will lightly “crush” the balsa shoulder and square up the tube/nose cone joint giving a sharper corner to the shoulder edge.
Sand square and clean up the bottom of the nose cone shoulder using the sanding block.
Note the difference in the “shoulder” sharpness in the AFTER Nose Cone.
ON KNOTS – TAKE NOTE!
Anytime you tie a knot, you can put a small drop of white glue on the knot. It will “set” and keep the knot from coming undone.
Examples: Knotted Kevlar on the engine mount, Kevlar tied to the shock cord, shock cord tied to the screw eye and parachute shroud lines. White glue works best for this.
TIP: DON’T USE SUPER GLUE ON KNOTS. Super glue will run up or down the line and stiffen the Kevlar, shock cord or parachute shroud lines. Use a small bit of white or yellow glue.
Continued on Page 4: Filling Seams and Balsa.


